
At Metaroom, Snapshots are powerful markers that show important areas within your scanned space. Whether capturing lighting fixtures, cables, pipes, or other crucial elements during scanning, Snapshots are your go-to feature for documenting important areas. With their precise locations, these markers become an integral part of the resulting 3D room model.
Please note: in August 2024, we renamed “Points of Interest” to “Snapshots”. Snapshots retain the same functionality, ensuring continuity in your experience.
How do I capture Snapshots while scanning with the Metaroom Scan App?
Follow these steps to capture Snapshots for a more detailed and informative 3D model:
- Open the Metaroom Scan App on your iPhone Pro or iPad Pro.
- Tap the Add Scan button.
- Follow the pre-scan recommendations:
- Clean your device lens.
- Close doors and windows in the room.
- Open curtains and blinds.
- Move objects apart to help the app detect them individually.
- Start scanning from a clear corner of the room, capturing both the floor and ceiling.
- Follow the guidance as you scan:
- Keep your distance from walls and objects.
- Move at a moderate speed.
- Walk around while scanning.
- To capture a Snapshot, point your device at the important area you want to document. Press and hold the Snapshot button for 2–3 seconds. This activates the feature tracker and captures a photo, creating a marker in your scan. Keep in mind:
- Maintain steady hand positioning to ensure a clear shot.
- If possible, make sure no other objects cover the area being marked — this ensures the best image and most accurate measurements in the Metaroom Workspace.
- Once you’ve finished scanning the room, tap Finish Section.
- On the review screen, check the 3D room model. If anything is missing, tap Rescan to start over. If you’re satisfied, tap Add Section to continue scanning another room, or Finish Scan to finalize.
- Great work! Keep the Metaroom Scan App open while the model uploads to the Metaroom cloud. Depending on the room size and your internet connection, this usually takes a couple of minutes.
- Once uploaded, you can access your 3D model from the Metaroom Scan App → Projects, or from Metaroom Workspace → Projects.
Remember: you’ll have the opportunity to add more information to the Snapshots in the reconstructed 3D model using the Metaroom Workspace. For more information, read the article “Snapshots”.
How do I color-tag Snapshots while scanning?
You can assign colors to your Snapshots while scanning. Tagging Snapshots with colors helps differentiate important areas within the 3D room model, enhancing internal communication and orientation. Follow these steps to assign a color tag to a Snapshot while scanning:
- Start scanning the room with the Metaroom Scan App.
- Choose a color for the Snapshot before capturing it:
- Tap the three dots on the right side of the scanning screen to expand color options.
- Select the desired color for your Snapshot.
- Capture the Snapshot by tapping the Snapshot button. Once captured, you’ll see the updated Snapshot count at the top of the scanning screen.
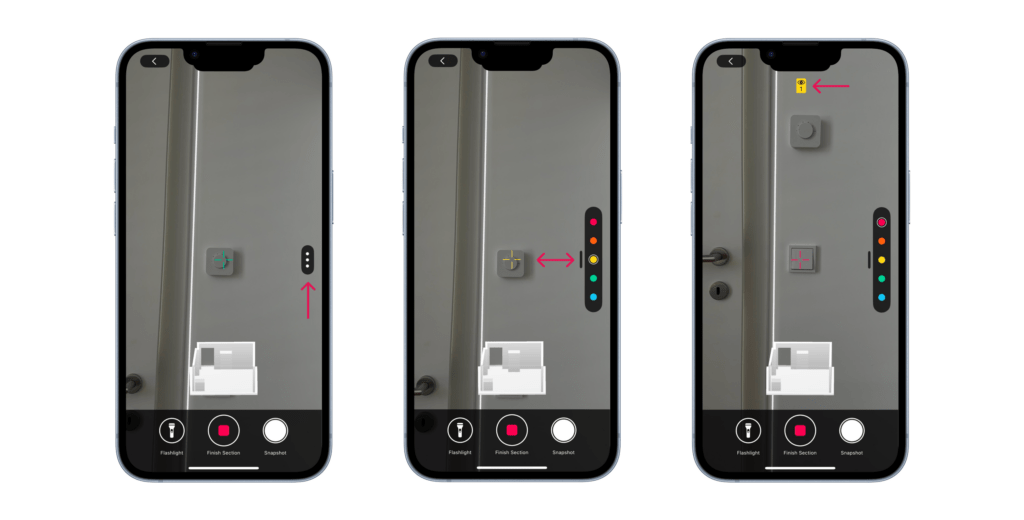
3. You can change the color as needed before taking additional Snapshots. Each Snapshot will appear as a card at the top of the screen, showing its assigned color.
4. After finalizing the scan section, you can review Snapshots and adjust colors in the app’s review mode.
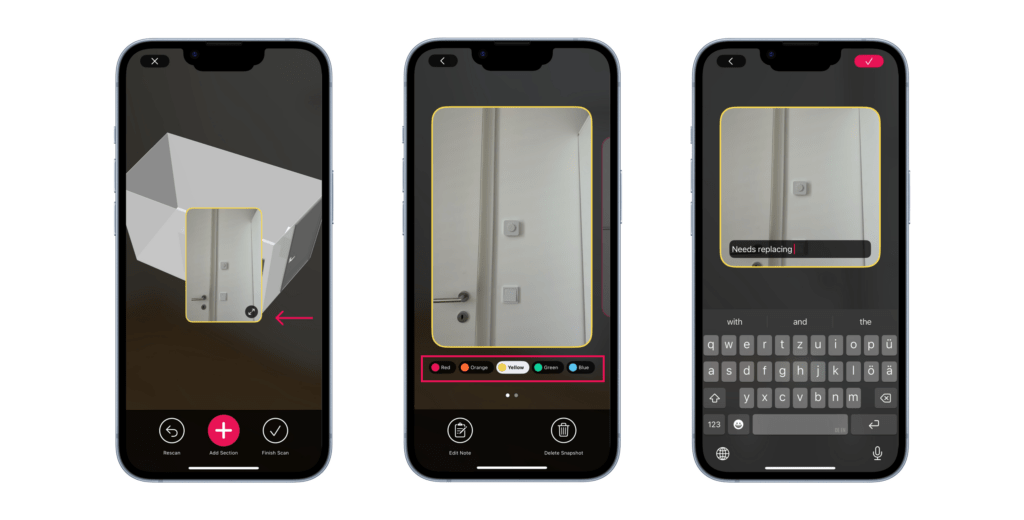
5. Once you complete the entire scan, access your 3D model in the Metaroom Workspace. Here, you can still modify Snapshot colors and add tags for further clarity.
Important note: if it’s easier to assign colors to Snapshots after the scan is complete, you can do this within the Metaroom Workspace.
How do I add Notes to Snapshots?
After scanning a section of your space, you can add Notes to your Snapshots to annotate important information about specific areas. Follow these steps to add Notes to Snapshots in scanning review mode:
- Start scanning the room with the Metaroom Scan App.
- Capture important areas by pressing the Snapshot button.
- Finish the scan section by tapping Finish Section.
- In review mode, tap the Snapshot you want to edit. This opens the Snapshot editing mode, where you can:
- Change the Snapshot color.
- Add written Notes to the Snapshot.
- Once you’re done, return to the general review screen. From here, you can either tap Add Section to continue scanning another room, or Finish Scan to finalize.
- Once you’ve finalized the full scan, you can access the 3D room model with Snapshots and Notes in the Metaroom Workspace. You can add more Notes as needed or export your model in the desired format.
Important note: if you didn’t add Notes during the scan review, you can still add them in the Metaroom Workspace. Notes will be included in the PDF Project Report when exporting your model.


