
Snapshots are 2D frames captured during the scanning process with the Metaroom Scan App and embedded directly into the 3D model. They help you document specific areas of interest, add annotations, and provide a visual reference when reviewing your scanned space in the Metaroom Workspace.
Please note: In August 2024, we renamed “Points of Interest” to “Snapshots.” Snapshots retain the same functionality as Points of Interest, ensuring continuity in your experience.
What can I do with Snapshots?
Snapshots serve as markers that highlight areas of significance within your scanned space. When scanning with the Metaroom Scan App, you can capture a photo of any noteworthy object in the room — whether it’s a lighting fixture, cable, pipe, or another key element. Snapshots appear as interactive icons within the Metaroom Workspace and can be color-tagged and annotated with Notes.
Please note that in most CAD software, Snapshots are displayed only as markers, without visual data, because many CAD programs and export formats do not support image integration.
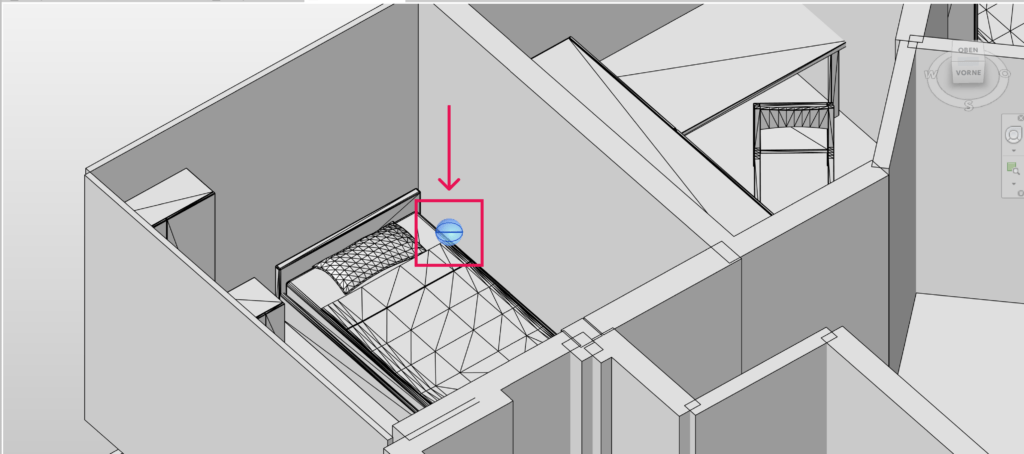
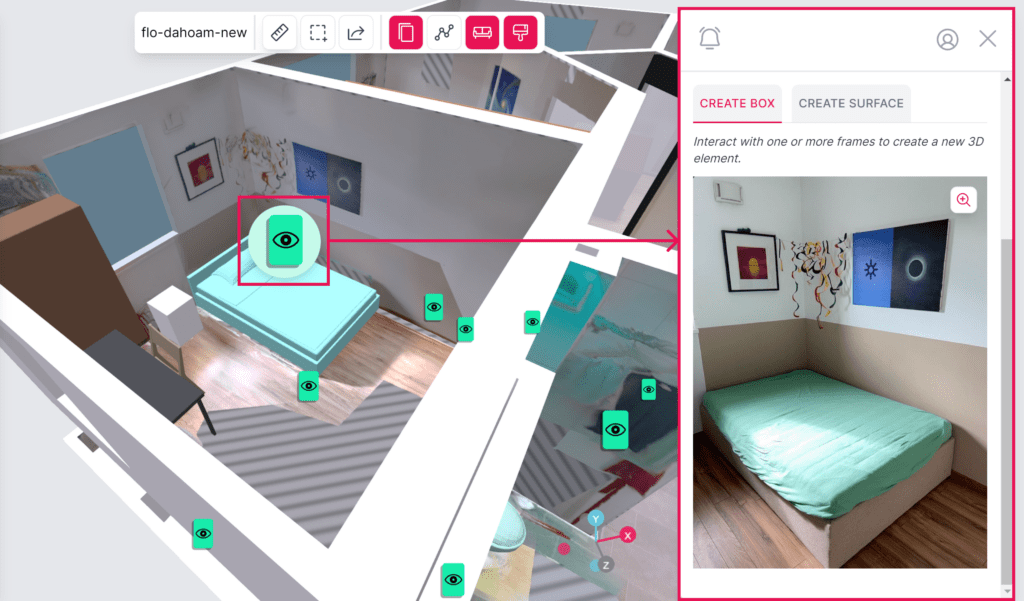
In the Metaroom Workspace, however, you can view the full visual details of Snapshots and extract 3D elements from them. Snapshots enhance your 3D scan by documenting every important detail of your project.
How can I capture Snapshots while scanning?
Follow these steps to capture Snapshots during the scanning process:
- Open the Metaroom Scan App on your iPhone Pro or iPad Pro.
- Tap the Add Scan button.
- Follow the pre-scan recommendations:
- Clean your device lens.
- Close doors and windows in the room.
- Open curtains and blinds.
- Move objects apart to help the app detect them individually.
- Start scanning from a clear corner of the room, capturing both the floor and ceiling.
- Follow the guidance as you scan:
- Keep your distance from walls and objects.
- Move at a moderate speed.
- Walk around while scanning.
- To capture a Snapshot, point your device at the area you want to document. Press and hold the Snapshot button for 2–3 seconds. This activates the feature tracker and captures a photo, creating a marker in your scan. Keep in mind:
- Maintain steady hand positioning to ensure a clear shot.
- Make sure no other objects are covering the area being marked — this ensures the best image quality and most accurate measurements in the Metaroom Workspace.
- Once you’ve finished scanning the room, tap Finish Section.
- On the review screen, check the 3D room model. If anything is missing, tap Rescan to start over. If you’re satisfied, tap Add Section to continue scanning another room, or Finish Scan to finalize.
- Keep the Metaroom Scan App open while the model uploads to the Metaroom cloud. Depending on the room size and your internet connection, this usually takes a couple of minutes.
- Once uploaded, you can access your 3D model from the Metaroom Scan App → Projects, or from Metaroom Workspace → Projects.
How can I view Snapshots and add 3D elements from them in the Metaroom Workspace?
Follow these steps to view Snapshots and extract 3D elements in the Metaroom Workspace:
- Open your scanned space in the Metaroom Workspace.
- Find the Snapshot you want to view:
- In the Model Tree, filter by type: click the Type dropdown and select Snapshot, or
- Click directly on the Snapshot icon in the 3D model view — this will automatically select the corresponding item in the Model Tree.
- Once you have selected the Snapshot, the Frame Interaction sidebar will display the image captured during scanning.
- To extract a 3D element from the Snapshot:
- In the Frame Interaction sidebar, select a geometry mode:
- Box: use this mode when it’s important to display the 3D dimensions of the element — for example, when adding a column to a room.
- Surface: use this mode for flat or complex-geometry elements — for example, when adding a luminaire to the ceiling.
- Click on the element in the Snapshot to create a selection frame around it. The instance segmentation system will outline the detected object.
- To refine the selection:
- Hold SHIFT and click to add areas to the selection.
- Hold ALT and click to remove areas from the selection.
- Optionally, add metadata to the 3D element:
- Element Name: enter a name to be displayed in the Model Tree.
- IFC Type: type the IFC element name or click the dropdown to select from the available IFC types.
- Tags: add a color tag for faster navigation.
- Click Save 3D element to add the element to your 3D model.
- Confirm the element’s position using the Transform Tool. Adjust the location if needed, then click ✔ in the Transform Tool toolbar to confirm.
- In the Frame Interaction sidebar, select a geometry mode:
The 3D element is saved to the scanned space and will be included in supported export files, where it appears in CAD software.
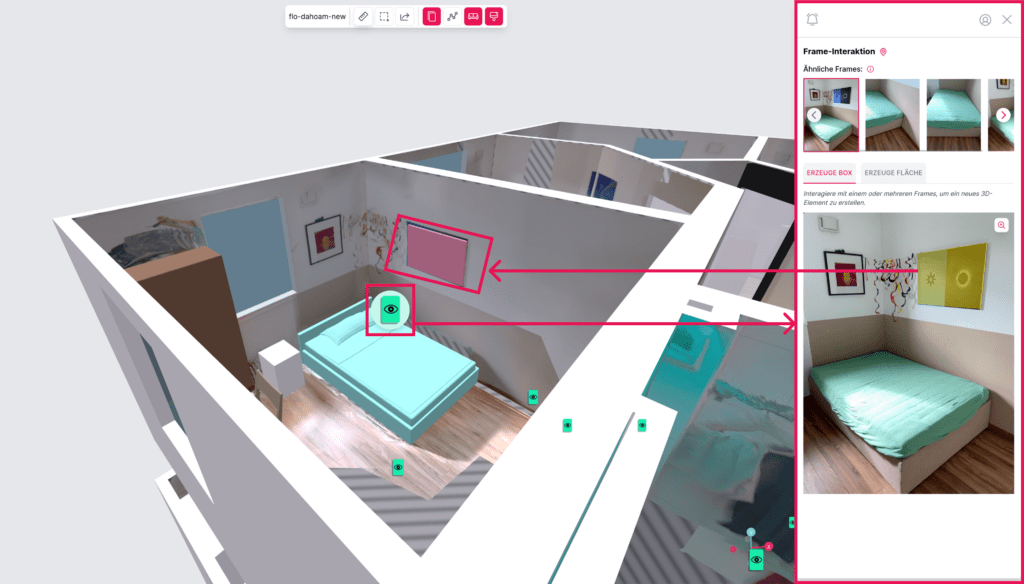
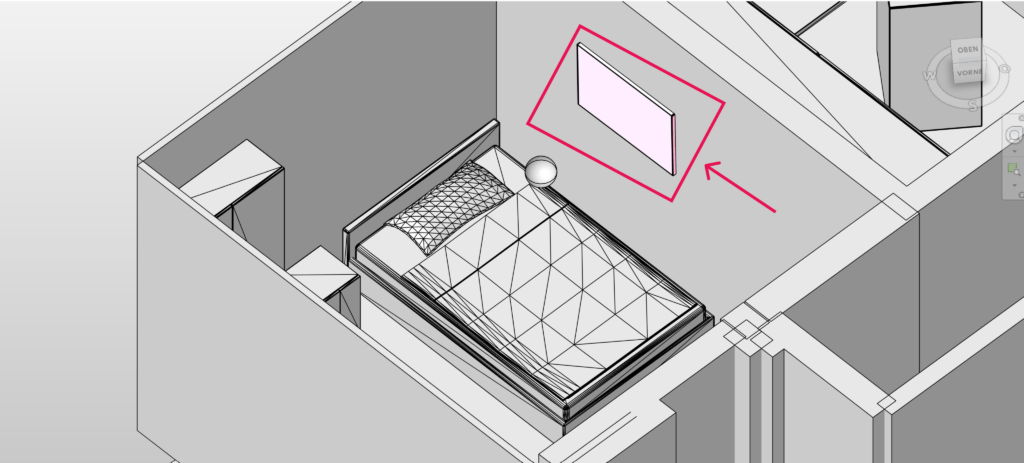
Important Notes: After creating a 3D element, you can edit its metadata at any time. Select it in the Model Tree, click the three dots next to it, and select Edit. In editing mode, you can change the name, assign color tags, add an IFC type, add Notes, or delete the element.
How can I assign color-tags to Snapshots in the Metaroom Workspace?
Color-tagging Snapshots allows you to highlight and differentiate important areas within your 3D room model. It improves internal communication and makes navigating the model easier.
Follow these steps to assign or update color tags in the Metaroom Workspace:
- Open your scanned space in the Metaroom Workspace.
- Find the Snapshot you want to tag:
- In the Model Tree, filter by type: click the Type dropdown and select Snapshot, or
- Click directly on the Snapshot icon in the 3D model view — this will automatically select the corresponding item in the Model Tree.
- In the Model Tree, click the three dots next to the Snapshot and select Edit.
- By default, the Snapshot color tag is green. You can delete the default tag and assign new ones by clicking the + button.
- Click Update to save your changes. The Snapshot color will be updated in the 3D model.
Please note: if you assign more than one color tag, only the first tag is displayed in the 3D model. However, all assigned tags and their names appear in the PDF Project Report.
How can I add Notes to Snapshots?
You can annotate Snapshots with written Notes that will also appear in your PDF Project Reports. Adding Notes helps you document essential details about areas that may not be visually evident in the 3D model.
Follow these steps to add Notes to Snapshots in the Metaroom Workspace:
- Open your scanned space in the Metaroom Workspace.
- Find the Snapshot you want to annotate:
- In the Model Tree, filter by type: click the Type dropdown and select Snapshot, or
- Click directly on the Snapshot icon in the 3D model view.
- In the Model Tree, click the three dots next to the Snapshot and select Edit.
- In the editing mode, enter a name in the Name field (the name will be displayed in the Model Tree and PDF Report) and add your annotation in the Notes field.
- Click Update to save your changes.
Your Note is now linked to the Snapshot. Notes are included in the PDF Project Report export, but not in other formats because most CAD software does not support text annotations.
In which export formats are Snapshots included as markers?
Snapshots are embedded as markers in the following export formats:
- .IFC 2×3
- .IFC 4
- .IFC SirkBIM
- .IFC ArchiCAD
- .IFC Revit
- .PDF 2D Project Report


