
Skip to content

Help Center

  • Back to amrax.ai
Login
  • EN
  • DE
  • Back to amrax.ai

    Login
    • EN
    • DE
Popular Search iphoneandroidscanexporthelp

Getting started with Metaroom®

  • Metaroom by Amrax® Overview 
  • What is Metaroom Scan App?
  • What is Metaroom Workspace?
  • Supported devices 
  • How can I download the Metaroom Scan App?
  • How can I create Metaroom account?
  • How do I log in to Metaroom?
  • How do I manage my profile settings?
  • How do I change my email or password?
  • How do I reset my password?

Scanning with Metaroom Scan App

  • How can I prepare space for scanning with the Metaroom Scan App? 
  • Which rooms can be scanned with the Metaroom Scan App? 
  • Metaroom Scan App’s offline scanning capabilities
  • Scanning with Tracking Assistant 
  • How do I scan a single room with the Metaroom Scan App? 
  • How do I scan multi-rooms with the Metaroom Scan App? 
  • How do I scan large spaces with the Metaroom Scan App? 
  • How do I scan complex rooms with the Metaroom Scan App? 
  • How do I scan multiple floors with the Metaroom Scan App? 
  • How can I scan a staircase with Metaroom Scan App? 
  • How can I scan a complex ceiling with the Metaroom Scan App? 
  • How accurate are the scan results? 
  • How do I get the most accurate result with the Metaroom Scan App? 
  • How can I capture Snapshots during scanning with the Metaroom Scan App? 
  • Scan reconstruction
  • Face blurring in scanned spaces

Metaroom Workspace Features

  • Snapshots (2D Frames in 3D Model)
  • Adding 3D elements to 3D model 
  • Enterprise Building Capture 
  • Transform Tool 
  • How can I reconstruct staircases in the Metaroom Workspace? 
  • How can I reconstruct a complex ceiling in the Metaroom Workspace? 
  • Notes in scanned spaces 
  • Assigning IFC classification to 3D elements 
  • GPS location data in 3D room model  
  • North Heading orientation in 3D room model  
  • Room categorization 
  • Room utilization type 
  • Basic measurements 
  • Object Selection & Grouping
  • Hiding & enabling room assets 
  • Scan Frames
  • Scan Path
  • Textures in the 3D room models 
  • Project sharing 

Export & Integrations

  • Detailed Overview of Metaroom Export Formats 
  • How do I export a 3D room model in the Metaroom Workspace? 
  • How do I export 2D floor plan?
  • How do I export a 3D room model for DIALux?
  • How do I export separate rooms in the multiroom 3D model for Relux? 
  • How do I export a 3D room model for Pytha 3D CAD? 
  • How do I export 3D room models to Palette CAD? 
  • Which CAD programs can import Metaroom’s 3D room models? 

Legal & Privacy

  • How is my data stored in Metaroom? 
  • What happens if customers do not allow the scan afterwards? 
  • What measures are in place for data backup and recovery? 
  • What is Metaroom’s policy on data sharing? 
  • How does Metaroom handle data breaches? 
  • How can I access my own data in Metaroom? 
  • How can I delete my data from Metaroom? 

More Questions

  • How can professional 2D floor plans be created with an iPhone?
  • How does iPhone-based LiDAR scanning improve the creation of 2D floor plans?
  • Can Metaroom be used for documenting existing buildings?
  • Can Metaroom 2D floor plans created with an iPhone be exported for CAD editing?
  • In which formats can 2D floor plans be exported?
  • Can Metaroom generate professional 2D floor plans suitable for renovation planning?
  • How fast can a building be scanned with Metaroom?
  • What is Metaroom not suitable for?
  • What is Metaroom suitable for?
  • Who is Metaroom suitable for?
  • Can Metaroom export 3D models for BIM workflows?
  • What devices are required to use Metaroom?
  • What export formats does Metaroom support?
  • How accurate are floor plans created with Metaroom?
  • How does Metaroom create floor plans?
  • What is Metaroom?
  • Why do I need an Apple Pro device for scanning?
  • Can I use an Android device for scanning?
  • Can I scan a couple of rooms and get one 3D model?
  • Can I scan multiple floors and get one 3D building model?
  • Is it possible to scan staircases?
  • Is it possible to scan ceilings?
  • Can I scan high-ceiling rooms?
  • Can I scan outside of the building (outdoor)?
  • Can I remove furniture from the 3D model? 
  • Is it possible to modify the scanned space after completing the scanning?
  • Is Metaroom a cloud-based solution?
  • How much does Metaroom cost? 
  • How big is the size of the file in the output format? 
  • Why does the mobile phone heating while using the Metaroom Scan App? 
  • Is there an option to manually change or insert items like doors, openings, objects, etc. to Metaroom’s 3D model? 
  • Would it be possible to have positions on the filigree ceiling by markers? (Drill holes e.g. for cabling) 
View Categories
  • Home
  • Docs
  • Metaroom Workspace Features
  • Transform Tool 

Transform Tool 

The Transform Tool lets you translate, rotate, and scale selected elements directly in the 3D model. You can drag handles in the 3D model or enter exact values using Smart Input. 

Please note: the Transform Tool is currently in beta. Scale mode is only available when exactly one asset or box object is selected. On mobile devices, only Quick Transform mode is available. 

How do I activate the Transform Tool? 

Follow these steps: 

  1. Select the element you want to transform — a whole floor, asset or imported submodel.  
  2. Click the Transform Tool button in the top toolbar. The button is only enabled when the selected element supports transformation. 
  3. In the Transform toolbar, choose a mode: Quick Transform, Move, Rotate, or Scale. 

      The hint below the toolbar updates at each step to tell you what the tool expects next. 
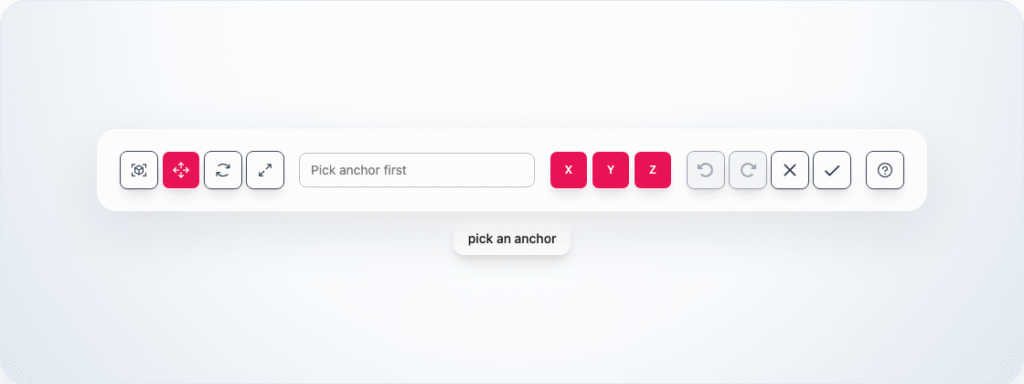
      You can also click the information button next to the Transform Tool to learn more about how to use it.  

      How do I use Quick Transform? 

      Quick Transform is the direct manipulation mode — you drag handles in the scene to move, rotate, or scale the selection. 

      Follow these steps: 

      1. Select the element you want to transform. 
      2. Choose Quick Transform in the Transform toolbar. 
      3. Click the center or a bounding-box corner handle to set the pivot point. 
      4. Drag the handles on the selected element to translate, rotate, or scale the selection. 
      5. Click the confirm button (✔) to apply, or the (X) cancel button to discard. 

        How do I move a selection? 

        Follow these steps: 

        1. Select the element you want to transform. 
        2. Choose Translate in the Transform toolbar. 
        3. Click a point on the selected element to set the anchor. 
        4. Click a target point in the scene, or type an exact distance in the Smart Input field and press Enter. 
        5. Click the confirm button (✔) to apply, or the (X) cancel button to discard. 

        Pro Tip: use the X, Y, Z toggles to constrain movement to a single axis or a plane (XY, XZ, or YZ). 

        How do I rotate a selection? 

        Follow these steps: 

        1. Select the element you want to transform. 
        2. Choose Rotate in the Transform toolbar. 
        3. Click a point on the selected element to set the anchor. 
        4. Click a reference point to define the starting direction. 
        5. Click X, Y, or Z to constrain the rotation to a single axis. 
        6. Click a target point in the scene, or type an angle in the Smart Input field and press Enter. 
        7. Click the confirm button (✔) to apply, or the (X) cancel button to discard. 

          Please note: Smart Input for rotation is only available after the anchor, reference point, and rotation axis are all set. 

          How do I scale a selection? 

          Scale mode is only available when exactly one box element is selected. 

          Follow these steps: 

          1. Select a single box element and activate the Transform Tool. 
          2. Choose Scale in the Transform toolbar. 
          3. Drag a scale handle on the selected element, or type exact dimensions in the Smart Input field and press Enter. 
          4. Click the confirm button (✔) to apply. 

            Pro Tip: hold Alt while dragging a scale handle to scale around the center instead of the opposite handle.

            What are the keyboard shortcuts? 

            • G — Quick Transform mode 
            • M — Move mode 
            • R — Rotate mode 
            • S — Scale mode 
            • X / Y / Z — toggle the corresponding constraint axis 
            • Ctrl+Z / Cmd+Z — undo the last step 
            • Ctrl+Y / Cmd+Y — redo 
            • Enter — confirm the current step or apply the transform 
            • Esc — step back, discard typed input, or exit the current flow 
            • Hold Ctrl while picking a target — temporarily disable snapping 
            • Hold Shift during rotate — enable edge-parallel snapping 
            • Hold Alt while dragging a scale handle — scale around the center 

            How does snapping work? 

            Snapping helps you pick precise points on the selected element without typing every value manually. 

            • In Move mode, snapping aligns to scene geometry (vertices and edges) and respects the active axis or plane constraint. 
            • In Rotate mode, snapping activates after the anchor, reference, and axis constraint are all set. Hold Shift while picking a target to snap to edges parallel to scene geometry. 
            • To temporarily disable snapping, hold Ctrl while moving the pointer. 

            Pro Tip: Smart Input and snapping can be combined in the same session — for example, set the anchor with snapping, then type an exact distance or angle. 

            How do I use Smart Input? 

            The Smart Input field shows a live readout of the current transform and also accepts typed values for precise results. 

            • In Move mode, it shows the current distance from the anchor. 
            • In Rotate mode, it shows the current angle. 
            • In Scale mode, it shows the current span. 

            Type a value and press Enter to apply it. Press Esc to discard the typed value without applying. 

            Common examples: 

            • Move: 1 moves 1 unit along the current direction; 1m,2m moves within a plane; 1ft,,0.5m! moves to exact coordinates. 
            • Rotate: 30° rotates 30 degrees relative to the reference; 30°! rotates to an absolute 30-degree angle. 
            • Scale: 1m sets the handle span to 1 meter; 1,2,3 sets width, height, and depth separately. 

            Please note: adding ! at the end of a value treats it as an absolute target rather than a relative change. 

            Share This Article :

            • Facebook
            • X
            • LinkedIn
            Updated on October 15, 2026
            Scan FramesEnterprise Building Capture 
            Table of Contents
            • How do I activate the Transform Tool? 
            • How do I use Quick Transform? 
            • How do I move a selection? 
            • How do I rotate a selection? 
            • How do I scale a selection? 
            • What are the keyboard shortcuts? 
            • How does snapping work? 
            • How do I use Smart Input? 
            Metaroom® Logo

            Product

            • Metaroom Scan App
            • Metaroom Workspace
            • Pricing

            Solutions

            • Light Planning
            • Architecture & Interior Design
            • BIM - Building Information Modeling
            • Wireless Network Planning
            • Facility Management

            Resources

            • Blog
            • Help Center
            • Support

            Company

            • About Us
            • Careers
            • Contact
            • Press Room
            • Imprint
            • Legal Notes
            • Privacy Policy
            • Terms of Use
            • Cookies
            © 2026 AMRAX, All rights reserved